|
Shortly after I bought Panache in 1985 I moved the fresh water tank from
under the cockpit to
the empty void under the forward berth because I needed the
storage space under the cockpit for light bulky stuff. The bow seemed
like the most logical place to put the tank. It was by sheer luck that the tank fit through the access hole. Later I discovered the extra weight
forward helps to offset the crew weight in the cockpit which makes
for faster sailing, more responsive handling, higher pointing and less hunting at anchor. An SJ23 sails at its
optimum while on its water line. Leave it to me to find a couple of technical
reason for a nice practical solution! See Note 1.
The rigid 10 Imperial gallon (45.5 L) rectangular tank is made of white polyethylene weighing 100 lbs (45 Kg) when full. It
is translucent so in daylight (or using a flashlight) it is fairly easy to see how full the tank is. While it just fits through the access hole in the forward berth, it was a hassle to pull out for end of season service as I always scraped my knuckles. It was difficult to support the rectangular tank
over the V shape of the hull and keep it from moving while heeled at 250 in pounding waves. My temporary supports usually collapsed with the tank resting at an odd angle, jammed into the V bottom. I doubt this
was any good
for the tank, the fittings, hoses, let alone the hull! But the bow location has operational advantages, so I made a proper
shelf to support the tank and sloped it aft so water could drain
drip dry for winter storage. This has worked so well that the tank has
never been removed since it was moved here in 1987.
Fig 1 shows the tank installed.
What is not shown are the long wedges of dense neoprene foam that I jamb between the top
of the tank and the under side of the V-berth to securely hold the tank down, vibration free.
|
Fig 1 - The water tank nicely tucked
under the forward berth, leaving lots of storage space aft of it. 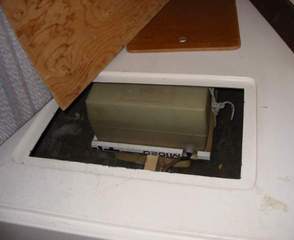
|
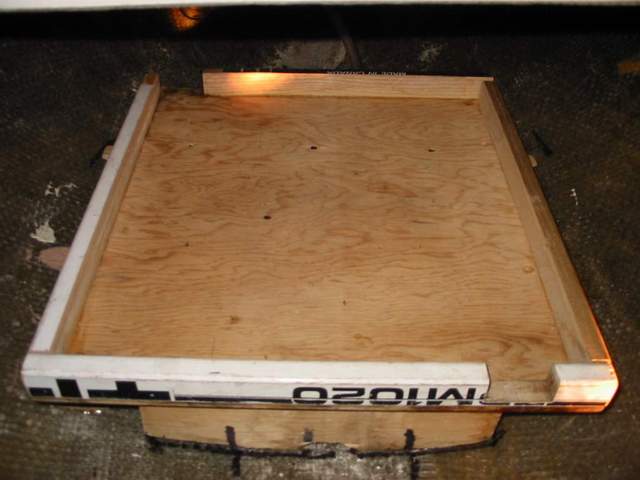
Fig 2 - The shelf that supports the tank showing scribe marks on the aft foot to align it to the hull for sticking it down with Sikaflex. 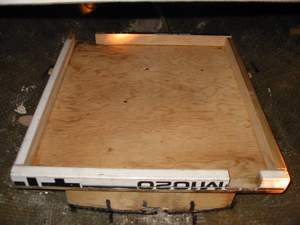
|
Fig 3 - The small 12V demand pump that
fills my coffee pot quicker than asking, "May I have a refill?" 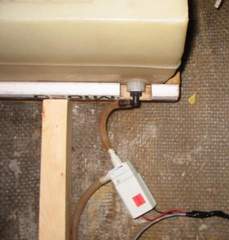
|
|
Fig 4 - The fill hose is just barely visible inside the upper left corner of the anchor locker door. 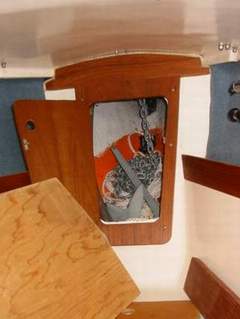
|
Fig 5 - Tank
fill hose & deck fitting. The vent thru hull fitting is just visible to
right of the fill hose.
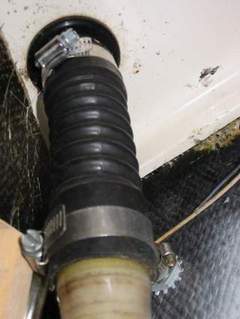 |
Fig 6 - Deck view of the black filler cap on the bow. It seals off the filler hose shown in Fig 5. Deck water has never flowed into the tank via the filler cap. The O-ring is doing its job.
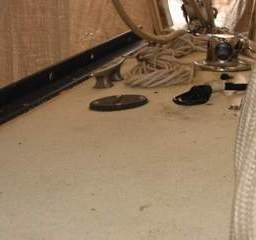
By the way, the filler tube never holds water, therefore no rubber taste and no leaks due to column pressure.
|
CONSTRUCTION - To
support the tank over the V shaped hull I fashioned a plywood shelf with two form fitted feet glued to the hull with Sikaflex. The shelf has never moved.
-
SHELF - Cut a section of
3/8" thick plywood (Fig 2) to fit under the
tank, plus a 1" wide
fillet at the perimeter. Draw an outline of the tank on the
center of the
plywood. Using stainless screws from underneath, attach a (1x1)"
fillet of hard wood
to fit snug around the tank. I used old hockey stick handles as they are a
renewable resource of excellent quality wood in Canada. The fillet keeps the tank from sliding off the shelf. Drill a 3/8" diameter drain hole through each corner of the shelf. Sand all corners smooth and coat with your favourite stuff to protect the wood.
-
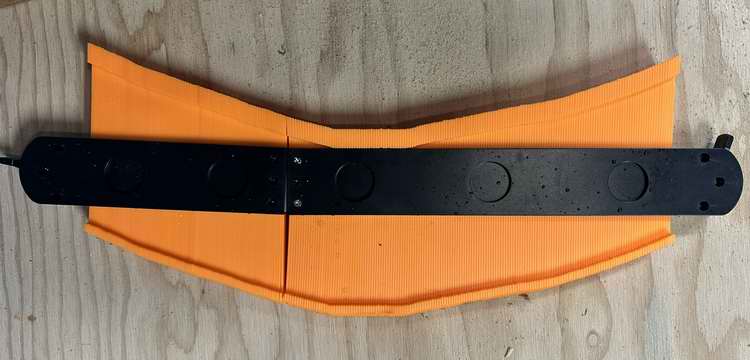
SHELF FEET - (This step requires a bit of juggling and some artistic work). Cut two 2x4s the full width of the shelf. Determine where they will rest on the hull and then draw a rough outline of each 2x4 on the hull. I used cardboard to make a template for shaping the bottoms of the 2x4s to match the curvature of the hull. Since the curve will be slightly
different at the forward side of the 2x4 than the aft side, make a
forward and an aft template. Place both templates against the same 2x4 and
draw the outlines. Then shape the bottom of each 2x4 to conform to
the hull shape. An easier technique is to use contour copier. Make the aft 2x4 slightly
lower than the forward one to ensure the tank has an aft slope,
towards the drain. This way all the water and any debris can drain out,
which is important
if you want to pump out the last drop or totally drain the tank dry for winter freeze
up. Draining dry is preferable to using
RV antifreeze which must be flushed out in Spring. I don't
like the after taste it leaves. The
final shape of the 2x4s should match the curve of the hull to within 1/8",
without hard spots. Sikaflex can fill the gaps. Remember to create a limber hole to drain water away from each foot.
-
Assemble the shelf and feet for a dry fit and to ensure the tops of the feet are parallel to support the shelf. Now
glue the feet to the hull using plenty of Sikkens Sikaflex under the 2x4s. Create a fillet around the 2x4 for additional holding power. This is definitely NOT a job for bathroom silicon
sealant as a full 10 gallon
tank weighs 100 pounds. When you slam the hull into a wave you need
all the holding power you can get. The advantage of
using Sikaflex
is that is has some give that helps to absorb shock.
NOTE - If the shelf is screwed to the feet (no glue) it
can be removed from the feet for future access. So glue the 2x4 feet to the
hull and screw the shelf to the 2x4s. Its only way to recoat the shelf.
-
Finally, use a couple of poly straps or ropes around the tank and plywood
shelf to hold the tank within the fiddles shown. (Fig
1
above)
-
FILL HOSE & FITTING - The filler hose
connects from the deck cap (Fig 6), goes down through the anchor locker (Fig 5) & (Fig
4) to the top forward corner of the tank. The hose is made from a potable opaque vinyl to inhibit bacteria growth. The filler cap is also opaque.
 A 1/2" vinyl vent line parallels the fill line and is connected to an OMC
gas tank vent I installed through the hull at the upper side of the
anchor locker. See Note 2. Both lines
are supported to eliminate
a sag that can trap water or grunge. The vent line is equipped
with a screen to keep bugs out. All components are potable grade. A 1/2" vinyl vent line parallels the fill line and is connected to an OMC
gas tank vent I installed through the hull at the upper side of the
anchor locker. See Note 2. Both lines
are supported to eliminate
a sag that can trap water or grunge. The vent line is equipped
with a screen to keep bugs out. All components are potable grade.
-
My
portable water jug for carrying water to the boat can lie on the deck while it
drains into the deck fitting (Fig 6).
-
TANK DRAIN - The tank drain is located at the aft right corner (Fig 3) with a straight barbed fitting (fast flow) that directs water to a small 12VDC demand pump. The centrifugal pump is below the tank and the gravity feed primes it. Occasionally I have to prime the pump by sucking water
through the tap. Yes it gets cleaned!
The water line runs
from the pump, under the port settee to the faucet in the galley. The pump
is controlled by a switch located next to the faucet. Push
the switch you get water, push the switch again and the water stops!
-
Shown at right is the completed shelf glued to the hull on shaped feet. Note the scribe marks on the shelf and hull are still in alignment after 40 years of sailing.
ABOUT POLYETHYLENE TANKS &
FITTINGS: Most polyethylene tanks come without hose fittings
unless it is a purpose made tank. So if you purchase one, fit it in the
boat and determine where you want the fittings to be. Mark the spot with
a felt pen and take the tank to the dealer or RV repair shop where they
can "weld" the fitting to the tank. If you have a leaky fitting or want
another one installed, they can do that as well. These shops have a tool that
resembles an electric drill that grips the fitting while it is spun in the hole against the body of the tank. The friction created between the
fitting flange and the tank melts the polyethylene on both sides. When the two
surfaces become soft enough, the operator simply stops the spinning the
fitting, holds the tool steady against the tank till the conglomerate cools and removes the tool when it solidifies. The operator knows from
experience when to stop turning. This is how he fixed a leaky fitting on Panache's tank. The repair took only minutes. The guy told me that a sure way to screw up a
fused fitting
like this is to apply side strain from a hose. So support the hose to eliminate
all strain on the fitting.
-
FILL FITTING - This fitting should be located on top of the tank or at the top of the sidewall. If the hose comes off you keep the water. There is also less force on
the fitting from water slopping in the tank.
-
DRAIN FITTING - Ideally the drain fitting should be
installed through the top of the tank and be equipped with a pickup
tube that extends to the bottom of the tank. This is to retain
the water if the
hose comes off. It also requires a displacement pump to suck up water. Unfortunately the majority
of RV tanks are equipped with an external bottom fitting for gravity
feed. But this also means you can use a centrifugal pump.
-
VENT FITTING - This fitting must be attached to the
top of the tank to pass air freely.
-
BAFFLES - Ideally the tank should be equipped with
baffles to prevent water from sloshing around too much, straining the
tank. This is hardly necessary on a SJ23 because the 10 gal tank is not big
enough to be concerned about it.
-
The tank rests on high density foam to
provide abrasion, thereby protecting the bottom.
SELECTING a WATER
PUMP for the SINK: It is most desirable to have a dependable pump so you
can draw drinking water from the tank at any time. After all, drinking
water is sort of important to sustain life on this planet.
The irony is
that you may be floating on the stuff but can't drink it! Having said
that, the pump should also operate quietly so you don't disturb the
sleeping crew. It's usually
very dependable and operates without electrical power. This is why many people choose a manual pump. The down side is that you have to operate it by hand or foot,
depending on the style. This is OK as you will use less water. I prefer a foot operated pump as they
free your hands to hold a glass under the tap. For an
electric pump I prefer a demand pump because they are quieter and consume
less power than a pressure regulated demand wobble pump you find on a
holiday trailer. Some boats have two pumps, a
manual foot pump for sea water and an electric pump for drinking
water. This saves the drinking water when all you need to do is
rinse. Salt water is a natural antiseptic. A foot pump installed through the settee wall close to the sink is
relatively easy to install since it requires such a small hole. Make the corners
of the hole slightly rounded to prevent cracks. If
done right, the
pump's mounting plate should restore the strength of the settee wall hole. Just make sure you install it where you are unlikely to trip over it.
Also make sure you can access the pump reasonably well for maintenance. By the way, you can judge the complexity of a boat by the number of pumps on
board so don't go crazy with pumps!
WATER QUALITY - Always pour clean tap water into the tank.
Then add a cap of Clorox (chlorine) or bleach to a full tank (10 gallons) of water to inhibit
bacteria growth. The vent line is equipped with a screen to keep
bugs out. The end of season tank drain ensures no sediment in the tank.
For these reasons I have not seen it necessary to filter the water to the
galley faucet. But if you find it necessary to treat your drinking water it is
recommended to go through the following three-step treatment;
Filter all
water that goes into the tank down to 1 micron. Chlorinate or maintain a
chlorinated tank. Filter the faucet water down to 0.5 micron using a carbon block
filter.
DECONTAMINATE A TAINTED TANK - There is a standard sanitizing procedure for recreational vehicles (ANSI A119.2 section 10.8) that works just as well for boats. I’ve added a few details, but the bones of it comes straight from the code and have been reviewed and accepted by the U.S. Public Health Service.
- Remove any carbon canisters or micron rated filters. Remove any faucet aerator screens. Wire mesh pump protection strainers should stay in place.
The plumbing will very likely slough off a layer of bacteria during later flushing steps.
Clean and remove the vent screen and flush the vent hose.
Use either following methods to determine the amount of common household bleach needed to sanitize the tank.
- Multiply gallons of tank capacity by 0.13; the result is the ounces of bleach needed to sanitize the tank. This is 1/8 cup of plain bleach (no fragrance) per 10 gallons.
- Multiply litres of tank capacity by 1.0; the result is the millilitres of bleach needed to sanitize the tank.
Mix the proper amount of bleach in a 1 gallon container of water.
This will provide better mixing and reduce spot corrosion of an aluminum tank.
Pour the solution (water/bleach) into the tank and fill the tank with potable water.
If possible, allow some solution to escape though the vent. (If the vent is exterior, prevent any spillage into local waters.)
This will sanitize the vent line.
Open all faucets (hot and cold) allowing the water to run until all air is purged and the distinct odour of chlorine is detected.
Leave the pressure pump on.
The standard solution must have four hours of contact time to disinfect completely. Doubling the solution concentration reduces the contact time to one hour.
When the contact time is completed, drain the tank. Refill with potable water and purge the plumbing of all sanitizing solution. Repeat until bleach is no longer detectable.
If the smell of bleach persists after two refill and drain cycles, add a teaspoon of hydrogen peroxide per 20 gallons and mix. The peroxide will oxidize the hypochlorite to chloride (salt) and oxygen, neutralizing the bleach. Any excess peroxide will be harmless to drink and will have no taste.
Peroxides are common ingredients in commercially available water freshening preparations. Don’t use vinegar, which can ferment, undoing all of your hard work.
Replace all filters and the vent screen.
Note for aluminum tanks: Some sailors are afraid of using bleach in aluminum tanks for fear of rapid corrosion. This shouldn’t be a concern for infrequent cleaning when the recommended dosage and time is observed. As an alternative, PuriClean is an effective sanitizer, and it is non-corrosive to aluminum.
WINTER STORAGE - Since there are no sags to trap water in the fill or
vent lines I pump
the tank dry just before haul out up the ramp. The tank will be almost empty when I pull Panache up the ramp. Then at her winter parking spot I remove the drain hose and collect the last bit of water out of the tank. Lastly I blow out the
remaining water through the pump, into the sink and out the hull, ready for winter freeze up. Then to protect the pump I shake the water
droplets out of it and give it a quick spray of cooking oil to prevent
internal corrosion. Sure a lot simpler than my previous method of
removing the tank every Fall to drain it. SAILING PERFORMANCE - What came as a total surprise was the improved sailing performance with the bow weighed down with the anchor and the water tank, sailing the boat more on its lines. Later I realized the combination of the rigid shelf (acting as a grid) glued to the hull, also added stiffness to the bow. With the added weight of the drinking water plus the foam jammed between the top of the tank and the V-berth, it really helps to deaden the sound of punching through bigger waves. NOTE 1 - While
much has been said about adding weight to the bow to level the boat for
fast sail performance, an easy weight would be to tie a five gallon jug of
water in the front of the V-berth. This will add about forty pounds to the bow and you can
vary the amount of water as you
need. There
never seems to be enough drinking water when you are cruising anyway. Five gallons
should last about four days if restricted to drinking. Fifty gallons of water
should last about 5 to 7 days if the electric pump is switched off
and the hand pump is used.
NOTE 2
-
A vent line is required to let air in/out of the water tank to drain or fill it. This creates the fastest flow by preventing air bubbles coming up the fill line, blocking water. Don't depend on a vent to handle an overflow. The tank and fittings are NOT designed to handle the extra column pressure from the fill line. The column pressure increases a disproportionate amount for the slight extra volume stored in the filler tube. The last thing you want is a bilge full of drinking water just to store a measly extra cup of water.
|